

Understanding Eyelet Press: What It Is and How It Works
What Is an Eyelet Press?
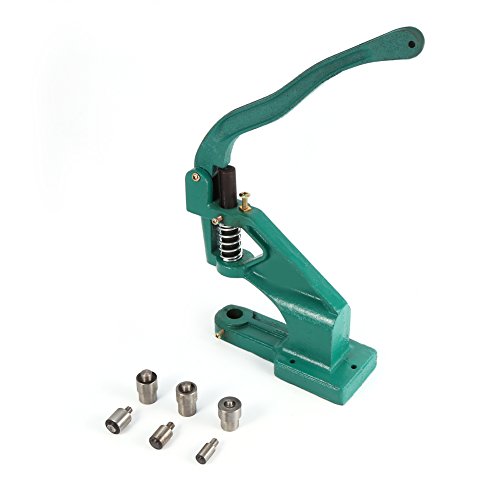
An eyelet press is a handy tool used for setting metal eyelets into various materials, such as fabric, paper, or leather. It’s commonly used in crafting, tailoring, and various DIY projects. By using this device, we can easily add durable holes around which items can be attached or laced, elevating the functionality and aesthetic appeal of our projects.
How Does an Eyelet Press Work?
Using an eyelet press is simple and effective. The tool usually consists of a lever mechanism that allows us to apply pressure evenly when installing eyelets. The process involves placing the eyelet in a pre-punched hole, aligning it with the press, and then pulling the lever down. This action transforms the eyelet from a flat disc into a secure, rounded shape that grips the fabric or material, resulting in a professional finish.
Key Features to Look For: Making the Right Choice
Manual vs. Electric Eyelet Presses
When considering which eyelet press to acquire, we should first determine whether a manual or electric version suits our needs best. Manual presses require physical effort but allow for better control, making them ideal for small projects. Conversely, electric presses automate the process and are advantageous for high-volume tasks, saving time and effort.
Adjustable Pressure Settings
Another critical feature to consider is adjustable pressure settings. This allows us to modify the force applied when setting eyelets, making it easier to work with different materials. Softer fabrics may need less pressure, while thicker materials will require more force. This versatility can significantly enhance our crafting experience.
Compatibility with Various Eyelet Sizes
Before choosing an eyelet press, we should check its compatibility with different eyelet sizes. Some presses only work with specific sizes, while others can accommodate a broader range. Opting for a press with multiple compatible sizes ensures we can tackle diverse projects without needing additional tools.
Benefits of Using an Eyelet Press: Why You Should Consider One
Enhancing Durability
One of the primary benefits of using an eyelet press is the durability it offers. Eyelets create reinforced holes, preventing fabric or material from fraying or tearing over time. This makes our creations not only beautiful but also built to last.
Professional Finish to Projects
Using an eyelet press elevates the overall appearance of our crafts. The clean, secure installation of eyelets contributes to a polished look, which can be particularly important for those of us selling handmade items or completing professional projects. It gives our work a level of refinement that is hard to achieve with manual methods.
Versatility Across Crafting Projects
Another significant advantage is versatility. Eyelet presses can be used for a variety of projects, including scrapbooking, garment making, bag design, and home decor. This use in multiple disciplines makes it a valuable addition to our crafting toolkit, allowing us to unleash our creativity freely across various fields.
Step-by-Step Guide: How to Use Your Eyelet Press Efficiently
Preparing Your Material
To start using our eyelet press efficiently, we first need to prepare our material. This usually involves selecting the fabric or paper and marking where we want to place our eyelets. A precise mark helps ensure that the eyelets are evenly spaced and correctly aligned.
Punching the Hole
Once we’ve marked our material, the next step is to punch a hole in the centre of each mark. Most eyelet presses come with a specific hole punch to use, ensuring that the right size hole is created for the eyelet we are using.
Setting the Eyelet
After we’ve made our holes, we place the eyelet into the punched hole, making sure it’s centred. Then, position the setting piece of our eyelet press over the eyelet. Pulling down the lever firmly will set the eyelet into place, securing it tightly in the fabric or material.
Finishing Touches
Finally, we should check that each eyelet is firmly in place. If needed, we can set them a second time to ensure they’re secure. After completing this process, we can admire our work, which should now have durable and professional-looking eyelets.
Top Recommendations: Our Picks for the Best Eyelet Presses on the Market
Best for Beginners: Compact Manual Eyelet Press
For those just starting out, we recommend a compact manual eyelet press. These are user-friendly, often lightweight, and don’t take up much space. They’re ideal for small projects, making it easy to learn the basics of working with eyelets without feeling overwhelmed by complex features.
Best for Professionals: Heavy-Duty Electric Eyelet Press
For seasoned users or those with high-volume projects in mind, a heavy-duty electric eyelet press is a smart choice. These machines handle various materials with ease and can set eyelets quickly, making them perfect for professional crafting or tailoring.
Best Versatility: Multi-Size Eyelet Press
If versatility is what we’re after, a multi-size eyelet press is our best bet. These presses come with accessories that accommodate different eyelet sizes, making them suitable for a wide range of projects. This flexibility allows us to tackle everything from light crafting to more demanding tasks with confidence.