Understanding the Benefits of Using a Sprouting Jar
Why Sprouting is Beneficial for Our Health
When we think about growing our own food, many of us picture gardens or large farms. However, sprouting seeds at home is a simple yet powerful method to enjoy fresh, nutrient-rich greens year-round. Sprouts are packed with vitamins, minerals, and amino acids, making them an excellent addition to our diets. They contain enzymes that aid digestion and are often easier to digest than their mature counterparts, providing a quick boost of nutrients without the need for extensive cooking.
Convenience and Cost-Effectiveness
Using a sprouting jar allows us to grow sprouts indoors, making it convenient for anyone, regardless of living space. With just a few seeds and a little water, we can have a fresh supply of nutritious sprouts on our kitchen counter. This method is not only cost-effective but also reduces our reliance on store-bought greens, which may not always be as fresh or nutritious. It’s a straightforward way to ensure that we have healthy food at our fingertips.
How to Choose the Right Sprouting Jar for Your Needs
Types of Sprouting Jars Available
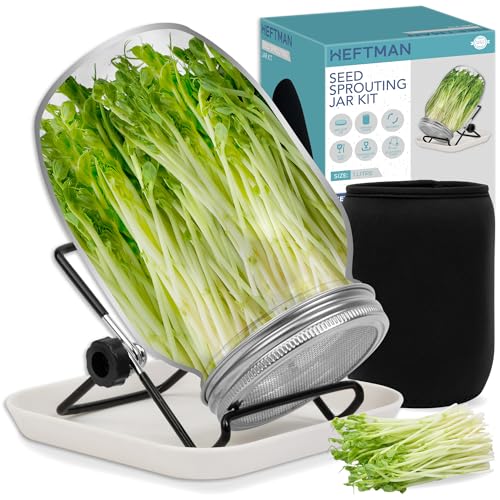
When selecting a sprouting jar, we encounter various options, from glass jars with mesh lids to special plastic sprouting kits. Glass jars are preferred by many for their durability and ease of cleaning. Mesh lids or sprouting screens allow for air circulation while keeping seeds contained, which is vital for proper sprouting. We should also consider the size of the jar. For beginners, a smaller jar may suffice, but those looking to produce larger quantities might opt for a larger capacity model.
Additional Features to Consider
Some sprouting jars come with additional features such as built-in stands or drainage systems, which can enhance the sprouting experience. A jar with an inclined base helps ensure that excess water drains effectively, preventing any sogginess that could lead to spoilage. Also, consider the amount and type of seeds we plan to use; some jars are better suited for smaller seeds, like alfalfa, while others can handle larger seeds, like beans.
Step-by-Step Guide to Successfully Sprouting Seeds at Home
Preparation: Choosing Your Seeds
The first step is to choose seeds that are specifically meant for sprouting. We should opt for organic and non-GMO seeds when possible, ensuring that our sprouts are free of harmful chemicals. Depending on our preferences, we can experiment with a variety of seeds, such as lentils, radish, or clover.
The Sprouting Process
Next, we begin the sprouting process by soaking the seeds in water for several hours, usually overnight. This initiates the germination process. After soaking, we will place the seeds in our sprouting jar, cover them with the mesh lid, and rinse them with fresh water. Keeping the jar in a warm location, we will need to rinse and drain the seeds two to three times a day. Within a few days, we will witness the magic of sprouting as we watch our seeds transform into green, edible shoots.
Harvesting and Enjoying Your Sprouts
Once our sprouts reach about an inch in height, they are ready to be harvested. We simply rinse them one final time and can either consume them immediately or store them in the refrigerator for later use. They typically last around a week when properly stored, allowing us to enjoy them at our convenience.
Creative Ideas for Using Your Sprouts in Meals
Enhancing Salads and Wraps
Sprouts are versatile and can enhance a myriad of dishes. They make an excellent addition to salads, providing a crunchy texture and fresh flavour. Mixing sprouts into wraps can elevate a simple lunch, adding both nutrients and visual appeal. For an added kick, we can pair them with bold flavours like spicy hummus or zesty dressing.
Incorporating Sprouts into Smoothies and Soups
For those who enjoy smoothies, adding a handful of sprouts delivers extra nutrition without altering the flavour significantly. They blend well into green smoothies, providing an easy way to boost our nutrient intake. Additionally, we can sprinkle sprouts on top of soups for added freshness just before serving, transforming a hearty meal into a vibrant masterpiece.
Maintaining Your Sprouting Jar: Tips for Longevity and Best Results
Proper Cleaning Techniques
To ensure our sprouting jar remains in optimal condition, it’s essential to clean it thoroughly after each use. We can wash the jar with warm soapy water and a soft brush, paying particular attention to the mesh lid to prevent residue build-up. Avoid using harsh chemicals that may linger and affect our sprouts.
Storage and Care
When not in use, we should store our sprouting jar in a cool, dry place to prevent any potential damage. Keeping it away from direct sunlight will also extend its life. If we frequently sprout, we may want to have multiple jars on hand, allowing us to foster continuous sprouting without interruptions.


