


What is a Worm Composter and Why Do We Need One?
Understanding the Concept of Worm Composting
Worm composting, often referred to as vermicomposting, is a natural process wherein worms, particularly red wigglers, break down organic waste such as fruit and vegetable scraps into nutrient-rich compost. This compost can then be used to enrich garden soil, promote plant health, and reduce the need for chemical fertilizers. Think of it as having a mini composting factory in your home that not only helps in waste reduction but also transforms waste into gold for your plants.
The Benefits of Worm Composters
By adopting a worm composter, we take a proactive step towards sustainable living. It allows us to recycle kitchen waste, thereby decreasing the amount of waste sent to landfills. Additionally, worm casting—the resulting compost produced by these worms—contains essential nutrients and beneficial microorganisms that can enhance soil structure, increase water retention, and promote healthy plant growth. Using a worm composter also means we will save on organic fertilisers in the long run.
How to Choose the Right Worm Composter for Your Space
Assessing Your Available Space
Before selecting a worm composter, it’s essential to evaluate the space we have. Worm composters come in various sizes and styles, from small indoor bins that fit under the kitchen sink to larger outdoor setups. Consider how much composting we anticipate doing and the available area for the composter. For smaller households or urban settings, an indoor composter might suffice. In contrast, those with gardens might opt for a larger outdoor bin.
Different Styles of Worm Composters
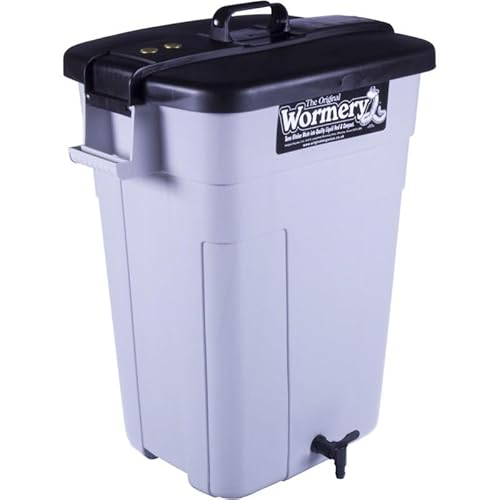
When choosing a worm composter, we have a few design options to consider. Tumbler styles allow for easy mixing while maintaining ventilation. Stacking bins enable us to expand our composting capacity without needing more ground space. Then there’s the traditional bin style, simple and effective for those new to composting. Each design caters to different needs and preferences, so it’s vital to choose one that suits our lifestyle.
Setting Up Your Worm Composter: A Simple Step-by-Step Guide
Preparing the Bin
Once we’ve chosen our worm composter, the first step is to prepare the bin. Begin by adding a layer of bedding material, like shredded newspaper or cardboard, which provides a habitat for the worms. This bedding should be damp but not soggy, as worms require moisture to thrive. Aim for a depth of about 10-15 cm.
Adding the Worms
After setting up the bedding, it’s time to introduce the worms. Typically, we’ll need about 500 grams of red wigglers for a small to medium bin. These worms will start to feast on the organic matter, breaking it down into compost. Just place the worms gently on top of the bedding, and they’ll instinctively burrow down to explore their new home.
Feeding the Worms
Start slow with feeding once the worms are settled. Overfeeding can lead to odours or unhappy worms. Introduce small amounts of kitchen scraps, burying them within the bedding to prevent attracting pests. It’s also important to vary their diet to ensure a balanced composting experience for the worms.
Feeding Your Worms: The Best Kitchen Scraps to Use
What Can Go Into Your Worm Composter?
Worms thrive on a diverse diet. The best kitchen scraps include fruit and vegetable peels, coffee grounds, and crushed eggshells. These items are not only loved by worms but also break down easily, providing a rich source of nutrition.
What to Avoid Feeding Your Worms
While worms are versatile eaters, there are some items we should steer clear of. Meat, dairy, oily foods, and citrus fruits can cause unpleasant smells and attract pests. Stick with plant-based scraps to maintain a balanced and healthy composting environment.
Maintaining Your Worm Composter for Maximum Efficiency
Monitoring Moisture Levels
To keep our worms happy and healthy, we must regularly check moisture levels in the composter. If the bedding feels too dry, add a little water. If it’s overly wet, we should aerate the bin and add more dry bedding material. Keeping this balance is key to a thriving worm colony.
Checking for Worm Health and Compost Quality
Regularly observe the worms for signs of distress. Healthy worms are active and a light pink colour. If we notice a decline in activity or strange smells, it may indicate issues within the bin that need addressing, such as improper feeding or moisture levels. Also, every few weeks, check the compost quality by seeing if it resembles dark, crumbly soil. This indicates that the composting process is on track.